How to fake an underwater photo with Photoshop
- Hayley Roberts
- Aug 24, 2015
- 7 min read
Updated: Nov 19, 2023

How long I’ve wanted to shoot underwater! When girls in pretty dresses are combined with the weightlessness of water the results are elegant and ethereal. But shooting underwater is costly as it requires expensive purpose-built camera housing (around $2k) or an underwater point and shoot, which is cheaper (around $500) but offers less control. You can hire equipment but I’ve heard too many horror stories and the one rental company I spoke to said they couldn’t afford the insurance. It’s also a very physically demanding experience for both the model and photographer. All this AND I’m the only person on my street without a pool (which I sadly discovered while browsing Google Earth). So I’d love to do an underwater shoot some day but for now my options are limited to Photoshop.
Please keep in mind this is an advanced tutorial.
How to photograph a fake underwater photo
First, find a blank background to photograph your model against so it’s easy to cut them out in Photoshop. I set up a black sheet because I knew this would roughly match the colour of the water I’d be compositing myself into. Light underwater is unpredictable but it definitely won’t have bright sun spots so shoot your model in diffuse light. I shot in my backyard in a shaded area as the sun was going down.

Testing the camera looking mighty impressed
Set your aperture narrow enough to have all of your model in focus (you can blur them later if need be) and choose a shutter speed that gives the tiniest amount of motion blur, but not too much or your person will be hard to cut out. (My settings were 1/160 sec at f/9, ISO 800.)
Resist any temptation to wet your model unless part of them will be out of the water and then only wet the exposed part.
For my pose I first started out by leaning back on a chair in the same way I would pose for a levitation photo but it wasn’t until I tried jumping and posing mid-air that I started to like the shots because the movement was similar to floating. I also separately shot hair and dress flicks that I didn’t end up using but I wanted to have the option available for compositing.
For the water you have a few options including creating it in post or using stock, but I wanted to photograph my own elements. I again set up a black backdrop so it would be easy to separate the bubbles using a blend mode, half-filled a vase with water making sure the vase’s surface wasn’t reflecting too much light and photographed the water line and then the bubbles as I poured more water into the vase.

Bubbles
How to edit a fake underwater photo in Photoshop
Before getting started I studied many underwater photos so I could try and replicate the look in Photoshop. The elements I decided I needed were these:
Bubbles
A water line / top of the water
Light rays
A reflection of the girl
Shimmers of light on her clothes and skin
Blue toning and matted highlights
Textures to give depth to the water
The following process is an amalgamation of tips from this video, other underwater tutorials found online and my own experimentation in Photoshop.
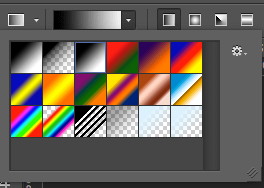
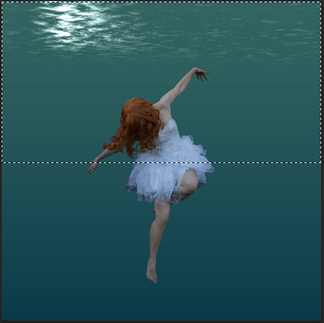
Create the background. To do this I found an underwater photo with colours that I liked and opened it into my main document. Hit g to activate the gradient tool and click on the gradient bar. In the Gradient Options select the first preset ‘Foregound to Background’ and then double click the left bottom tab (‘stop’) to bring up the colour picker. Alt/Opt click on a highlight colour in the sample photo to select it and press OK, then double click the right bottom tab and sample a shadow colour. Keep pressing OK until you exit the Gradient Editor then draw a vertical line downwards over your canvas so that the lighter colour is at the top. (Make sure the ‘reverse’ box isn’t ticked if you find this isn’t the case.)
Next you’ll need to create the top of the water. You can do this using stock photos (for example, waves at a beach) by going to Edit>Transform>Distort and playing around with the perspective handles, but I’d found a tutorial on how to create water from scratch that I wanted to try.
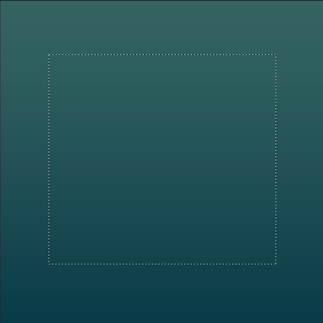
To do this create a new layer and draw a rectangle with your marquee tool (m) about 2/3 the size of your main document. Press d so that your colour swatch is set to default colours and go to Filter>Render>Clouds. Press Ctrl/Cmd t to bring up your free transform handles and drag the edges of the box to the edges of your document.
Now go to Filter>Filter Gallery>Artistic>Plastic Wrap (if the Filter Gallery is greyed out you may first need to change your image from 16 to 8 bit with Image>Mode and choose 8 Bits/Channel) and set your sliders to 14, 3 and 11. Click OK. Then go to Edit>Transform> Distort and pull your handles into place as shown. Change the blend mode to Linear Dodge. Add a mask to the layer and use a soft brush to remove the harsh edges. Add a curves adjustment layer above your water line layer and clip them together by pressing Alt/Opt and clicking between the two layers. Use curves to darken the layer to match your background.
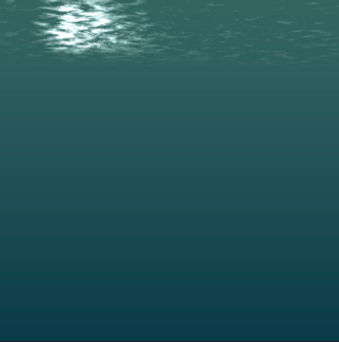
Convert your water effect layer to a smart object (right click the layer in a blank area and choose ‘Convert to Smart Object’) and then go to Filter>Render>Lighting Effects and add a small spotlight to a section of the water. Play with the sliders to get an effect you like and the handles of your light to shape it. Press OK when you’re finished. It’s sometimes hard to get an idea of what the final effect will look like until it’s applied which is why it’s a good idea to apply lighting effects as a smart filter so you can keep changing the effect until you like it.
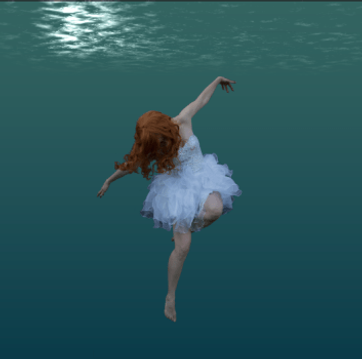
At this point I made sure my subject was perfectly cut out and placed her above these effects.
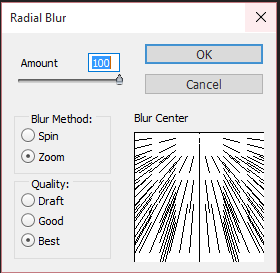
Create rays of light by making a new layer and using your marquee tool to select the top half of the image. Press d to set your colour swatch to default and then go to Filter>Render>Clouds once again. Next go to Image>Adjustments>Threshold and use the default setting, press OK. Press Ctrl/Cmd D to get rid of the selection. Now go to Filter>Blur>Radial Blur. Take your amount to 100. Choose Zoom and Best and drag the centre point to the top of the box. Click OK. Press Ctrl/Cmd F a few times to repeat the effect. Change the blend mode to soft light and the opacity to about 50%. Use Ctrl/Cmd T and move your rays so they look like they’re coming from the spot light you created earlier. Add a mask and use a soft brush to paint out the rays wherever you don’t want them.
I had no clue how to create the girl’s reflection so I created some tricks of my own. First I duplicated my subject layer and converted it to a Smart Object with Filter>Convert for Smart Filters. I then went to Edit>Transform>Flip Vertical and used Edit>Transform to move the reflection where I wanted it and dragged the top middle handle to make it quite squat. After playing around with all Photoshop’s filters I found I got the best result with Filter>Distort>Wave and played around with the sliders until I got a result I liked. Because I applied this as a Smart Filter I was able to apply and change the results as much as I liked.
To create the shimmers of light I created a new layer and filled it with black. Then I went to Filter>Noise>Add Noise. I chose Gaussian and Monochromatic and set the amount to about 35%. Now I went to Filter>Pixelate>Crystallize and made the Cell Size 160. This is similar to how we created snow last tutorial. Now go to Filter>Stylize>Find Edges. Press Ctrl/Cmd i to invert the layer. Choose Filter>Distort>Ripple and make it about 300. Then Filter>Blur>Gaussian Blur and just apply a little to make the edges less severe. Change the blend mode to screen. Zoom right out of your document and pres Ctrl/Cmd T and make this layer larger. Clip this layer to the subject, change the opacity to 60% and mask it out where you don’t want it.
The bubbles were added using a screen blending mode and then I clipped a levels layer to the bubbles to get rid of any lingering background. You could also use a bubble brush to create the bubbles.

Bubbles added
I used a few curves layers clipped to the girl layer to introduce some bluey green toning and then darkened the bottom of her body. I also desaturated her skin tones and dragged the highlights down to dull them slightly. A good trick I learnt recently from Glyn Dewis is to make the opacity of your subject layer 95% so the background shows through ever so slightly and tones your subject to match the scene.

Colour toning
Adding textures is optional but I thought the scene looked too flat without them. I added various bokeh textures and overall colour toning to give depth to the water.

Final toning and textures
And we’re done! It’s definitely a lot of work but the more effort you put into it the more realistic your final result. And not a single camera was harmed.
About ‘Rosewater’ and ‘I Tried to Drown my Sorrows’
The poses for both photos were photographed in my backyard wearing a $10 dress I found through a Facebook “garage sale”. Little known fact, I studied six different types of dance as a child and I finally got to use some of this training in my photos. Unfortunately my body is no longer primed for this kind of activity and my legs hurt for days.
In Photoshop I was hoping to recreate the particular look used in this Adam Attoun photo.
‘I Tried to Drown my Sorrows’ started out with this in mind but by a happy accident when I opened a vase photo to use the bubbles I noticed how great the girl looked inside the glass, so this image took on a life of its own and was very quick to complete.
To create ‘Rosewater’, I began by following along with the video tutorial posted earlier to see if I’d like the result which I did, so she ended up being in a bluey/green scene rather than black because the colours grew on me. I always planned to have flowers floating in the water so I shot some miniature roses in a vase and was most annoyed to discover that roses float so I had to poke them into the water with a gardening fork. Despite being miniature the roses still look way too big for the scene, ruining all my convincing underwater scene building but I like how they look and am happy with the final photo regardless.


